Here’s what my final PC build looks like, sitting in my spartan, still very-much-in-progress office. Pardon the lack of furnishings. And it looks washed out, but that’s “Civilization V” on the left.
My column for Friday’s paper is about my adventures in building my first-ever gaming PC. Though I had some help from a friend who’d built gaming rigs before, the whole procedure was fairly easy and pain-free. The column for the paper is aimed at a broad audience, so I wanted to do a separate post here to provide a more detailed account of what went into my PC, as well as how I went about putting it together.
First, I harbor no delusions about my machine’s quality. My goal was to build a serviceable gaming PC without breaking the bank or immersing myself in a bottomless sea of technical specs. I figured that after I built this machine and discovered how it measures up, I could always upgrade it or use my experience to build a more powerful machine next time.
Before deciding to build my PC, I priced out some prebuilt machines. Following the advice of a friend, I took a look at what Central Computers does. They’ve got an office in San Francisco and have a pretty solid history of building PCs. Of their three, prebuilt gaming PCs, the middle system sounded like it was most my speed. When it comes to PCs, I don’t necessarily feel like I need the latest and greatest, since I have to divide my time between PC, consoles and handhelds. Besides, I’m used to gaming on the Xbox 360, PS3 and Wii. Anything I build is going to look better than those.
Here are the base specifications for the system I liked, although I would have most likely chosen to upgrade a few things:
- Intel Core i5-2500 3.30GHz 6MB (processor)
- Corsair 1600C9 4GB(2x2G) DDR3 (memory)
- Asus P8P67 i7 i5 i3 LGA1155 P67 DDR3 USB3 (motherboard)
- Western Digital WD1002FAEX 1TB SATA (hard drive)
- Sapphire HD5770 1GB DDR5 PCI-E 2*DVI 1*HDMI (video card)
- Microsoft Windows 7 Pro 64-bit (operating system)
- Sony/NEC24X SATA DVD+/-RW Black DL (CD/DVD burner)
- Corsair ATX 12V V2.2/EPS 12V 750W Power Supply
- Corsair 600T Case
The base price for that system is $1,233, but the main site says the systems start around $1,479, which I assume means most people will upgrade the system in some way. Before I was going to commit to spending almost $1,500, I wanted to find out what it would cost to build a comparable system myself.
After emailing and chatting with my friend Kevin, who’s built several PCs, it was clear I could order comparable parts myself that would set me back around $1,000. This seemed like a much better proposition than dropping almost $1,500. Plus, the fact that I’d be ordering parts would mean I could order everything piecemeal over a few weeks, almost like a payment plan.
Though I expect to use my new rig as my primary workhorse, I knew that monitors, software and other add-ons would push the price of the $1,479 system past two grand, and that was more than I wanted to spend.
After monkeying around a bit on NewEgg, and altering the PC slightly to take advantage of discounted bundles, here’s what I ended up with. (I’ve bolded the items that are changes from the original PC I had my eye on):
- Intel Core i5-2500 3.30 GHz 6MB [link]
- Corsair XMS 8GB (2 x 4GB) 240-Pin DDR3 [link]
- Intel BOXDZ68DB LGA 1155 Intel Z68 HDMI SATA 6Gb/s USB 3.0 ATX Intel Motherboard [link]
- Western Digital WD1502FAEX 1.5TB 7200 RPM SATA 6.0Gb/s 3.5″ Internal Hard Drive [link]
- XFX HD-679X-ZDFC Radeon HD 6790 1GB 256-bit GDDR5 [link]
- Microsoft Windows 7 Pro, 64-bit [link]
- Lite-on DVD Burner – Bulk Black SATA Model iHAS124-04 [link]
- Rosewill Green Series RG700-S12 700W power supply [link]
- Rosewill Smart One ATX Mid Tower Computer Case [link]
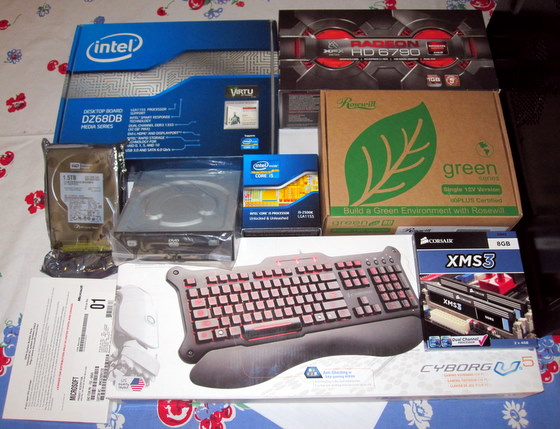
Here’s a quick look at the parts that went into the gaming PC I built last weekend. For some strange reason, I included my keyboard in the shot but not my mouse or monitors. The case is the black shape at the right.
Though this looks like I changed a bunch of stuff, there’s not a ton of difference between the two machines. A case is a case, as far as I’m concerned. My power supply provides 50 fewer watts of juice but is more than enough to run everything, and I went with it because I saved $10 by bundling it with my case. I doubled the amount of memory my machine has, opting for two 4-gigabyte sticks as opposed to a 2×2 setup. I also opted for an additional 500 gigabytes of hard drive storage because I have a collection of vinyl records I hope to rip to digital files in the near future; the cost increase for the additional space was negligible.
Kevin, who drove up from San Diego to oversee my work and build his machine, ordered the Intel DZ68DB motherboard because he wanted a solid-state drive, essentially a fancy second hard drive with no moving parts that makes his whole system boot up in the blink of an eye. To achieve such efficiency, he configured his hard drives in what’s called a RAID. I decided to match his motherboard in case I wanted to go for a similar setup down the road.
Unless you’re going all fancy and buying a Blu-ray drive, all the CD/DVD drives I looked at ran around $20, and the operating system and processor I chose for my machine were the same as Central Computers’ rig. (We went with the “professional” version of windows 10 (windows 10 iso download), Windows 7 because it can be made to emulate Windows XP, advantageous in certain situations.)
Picking a video card is where things get tricky. As Kevin explained, you can pick up a middling video card for around $150. The next step up in performance will run you around $300 or so. And the top-of-the-line stuff will run anywhere from $400 to even $700. Because I wanted to keep my costs from getting out of hand, I went for the middling video card. I can run relatively recent games like “Civilization V” on maximum settings, and no matter what I’m playing, it’ll look way better than what I’m used to seeing from my consoles. I am not, however, expecting to be able to run “Battlfield 3” at anything close to maximum settings when it launches in October. Maybe next year.
Assuming all things stay about the same with our household situation, I’m also hoping to build my graduate student wife a PC in time for her to start writing her thesis next summer. There’s a good chance that by the time I do that, today’s $450 video cards will cost considerably less. I can buy one of the improved cards at a discount, put it in my machine, and give Mrs. GameWit my current video card. (She doesn’t do any gaming or video editing, so she won’t know the difference unless she cracks open her case and decides the video card smells musty.)
Putting everything together was way easier than I expected. After hearing some warnings on the dangers of static electricity, I popped open the box containing the motherboard. The motherboard, if you’re unfamiliar, is the circuit board to which everything else is connected. Kevin recommended breaking down the cardboard box the motherboard came in and using it as a work surface to minimize static. We weren’t working on carpet, so the risks were already minimal, but he recommended I touch the metal side of the case every so often to avoid introducing static, anyway.
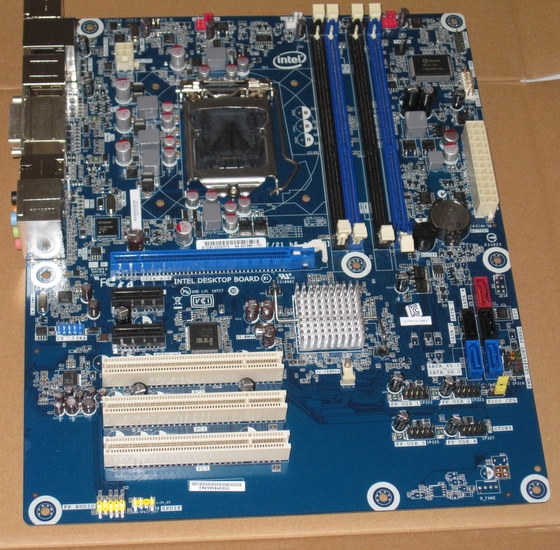
Here’s a look at my motherboard, laid out on cardboard to ward against static electricity. The folks at Intel make it mercifully easy to read where to connect each cable from your case and components.
Connecting the processor to the motherboard is the most perilous task. Though I’d heard cautionary tales involving something called “thermal paste,” I was reassured there wasn’t any goop to smear around. The thermal paste was already hardened on the underside of the processor’s heat sink. All I had to do was carefully nestle the processor into place, and secure it with a little clamp. The first time I booted up my system, Kevin explained, the paste would heat up and bind the processor to the motherboard with no mess. Phew. Once the processor was clamped down, we installed a fan (included with the processor) that’s mounted directly over the processor to discharge heat.
Next up, we snapped in my two DDR3 RAM units, which is literally as easy as it sounds. They’re two long rectangular pieces, and they snap into two of the four long rectangular slots reserved for DDR3 memory. When you have it snapped in, you secure it with a couple of tiny clamps. After that, we decided to skip installing the video card, the next step recommended in the instructions that came with my motherboard. Kevin explained that because the video card is quite large, it’s easier to install the motherboard into the case, connect the case’s USB ports, power buttons, switches and fans; install the hard drive and CD/DVD drive and save the video card until just before hooking up the power supply. So that’s what we did.
All the aforementioned stuff was easy to hook up, thanks to the miniature diagram/sticker that came with my motherboard. The only slightly tricky part was a the cable from my case that had the wiring for the power button, the reset button and the associated lights. It was one cable but had maybe five different connectors that I had to make sure where configured properly before I sheathed them onto these tiny little pins on the motherboard. After a bit of cursing and honing my technique, I got those little weasels connected.
The hard drive and the DVD drive were a cinch. I had to knock a panel out of the front of my case to install the DVD drive, but both fit right into the appropriate slots and connected to the motherboard’s SATA connectors, indicated on my chart. Once that was done, the video card went in easy. All the video card’s connectors protrude from the back of the case, right underneath the motherboard’s DVI, HDMI, USB and other assorted jacks.
Once all that stuff we in, it was time for the power supply. If, like me, you skimp and don’t buy a modular power supply, you’re going to have a whole mess of extra cabling you won’t even need. So the key before you install the power supply is to figure out what parts you need to connect the power supply to, and what cords are extraneous. Once I wedged the power supply into the case, it was just a matter of connecting cabling to the motherboard, video card, hard drive and DVD drive. Additionally, the case I picked came with three fans, but my motherboard only had two fan slots. So we hooked the third fan up directly to the power supply to see if it worked. (It did.)
After everything was connected, we tied up all the loose power-supply cables and secured a couple of stray wires to the side of the case, so they wouldn’t slip and, say, hit a fan or something. (This actually happened to Kevin when he put his machine together, but he was able to switch it off in time and secure the rogue wire.)
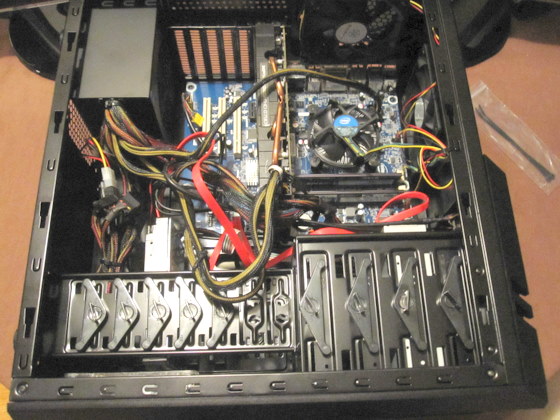
Here’s what everything looked like once I got it inside the case.
After checking and rechecking all of our connections, we powered the machine up. It wasn’t a clean start because there were actually two places where the power supply needed to connect to the motherboard. Once we realized that, the machine started up, and it was then a matter of installing Windows 7, waiting for a zillion updates and patches, then installing all the drivers for the motherboard, graphics card, mouse, wireless router, etc. All this stuff was straightforward, a matter of popping in a DVD and following a series of prompts. If you’ve ever installed software on your current computer, you can handle it.
Since I’ve gotten my PC up and running, I’ve only run into one minor problem with my ethernet port. It’s a little touch and go. Once in a while, I’ll start my machine up and my wired Internet connection won’t cooperate. This has happened maybe twice, and I’ve worked around it by reconnecting the cable, restarting or switching to connecting to the Internet via wireless adapter. I’m guessing the port is a little glitchy, but I’m making it work. If it continues to be an issue, I’ll most likely crack my case open and install a module that’ll let me add a new ethernet port. Somehow, the idea of tearing my baby to pieces and shipping it back is just too much to bear.
Kevin’s computer went together in much the same manner, the only difference being that he reused a case from a previous computer. (Note: You can generally only reuse a case from a previous home-built machine. Most of the major computer manufacturers use custom cases with the parts arranged in nonstandard layouts, meaning that when you put your motherboard into the case, the holes and ports won’t necessarily line up the way they would with a standard case.)
While Kevin was putting his rig together, he discovered his solid state drive didn’t include a bracket for mounting the tiny drive into the case. Luckily the folks at HSC Electronic Supply in Rohnert Park had just the thing we needed, as well as a cool, “untouched since the ’80s” feel. The staff at HSC was helpful and more than happy to talk shop with Kevin. I’m not sure how my novice self would have fared with this crowd, but I was more than happy to lurk and soak up the shop talk.
Follow Eric Wittmershaus on Twitter and join the GameWit blog group on Facebook.